Delightful Crystals - A Guide To Making Crystal Candy
Have you ever thought about making something truly special, something that looks like tiny jewels but tastes like a sweet dream? It's almost like magic, seeing sugar transform into shimmering, edible formations. Creating your own crystal candy is a wonderfully rewarding activity, bringing a little sparkle into your kitchen and, you know, a lot of joy to anyone who tries it. This guide is here to show you just how simple it can be to whip up these charming treats.
Imagine holding a piece of candy that catches the light just so, revealing intricate patterns and a captivating shine. That's exactly what crystal candy offers. It's a sweet that pleases your eyes as much as your taste buds, a bit of edible art, if you will. This sweet creation, sometimes called rock candy, has a unique texture and a pure, sweet taste that is rather satisfying.
So, if you're ready to add a touch of sparkle to your day, or perhaps make a truly memorable gift, you've come to the right spot. We're going to walk through each step, making sure you feel confident and ready to grow your very own delightful crystals. It's a process that asks for a little patience, but the outcome is, honestly, quite worth it, promising a truly pleasing result.
- Discovering Dermot Kennedy The Height Of A Rising Star
- All You Need To Know About Emily Compagnos Age And More
- Buldak Recall Unpacking The Spicy Controversy
- Unveiling The Mystery Who Is Liz Gillies Husband
- Did Mike Wolfe Die
Table of Contents
- What Exactly Are These Delightful Crystals?
- Gathering Your Sweet Supplies for Delightful Crystal Candy
- How Do You Grow Delightful Crystals at Home?
- Adding Flavor and Color to Your Delightful Crystals
- What Makes These Delightful Crystals So Special?
- Displaying and Storing Your Delightful Crystal Candy
- Troubleshooting Your Delightful Crystal Candy Creations
- Beyond the Basics - Creative Twists for Delightful Crystals
What Exactly Are These Delightful Crystals?
When we talk about crystal candy, we're really talking about a sugar creation where sugar molecules have been encouraged to link up and form large, visible structures. It's a bit like how natural crystals form, only we're speeding up the process in our kitchens. These aren't just any old sweets; they are, in a way, a science project you can eat, which is pretty cool. The basic idea is to make a sugar solution that is so full of sugar, it simply cannot hold any more, and then give the sugar a place to settle out and form those lovely shapes.
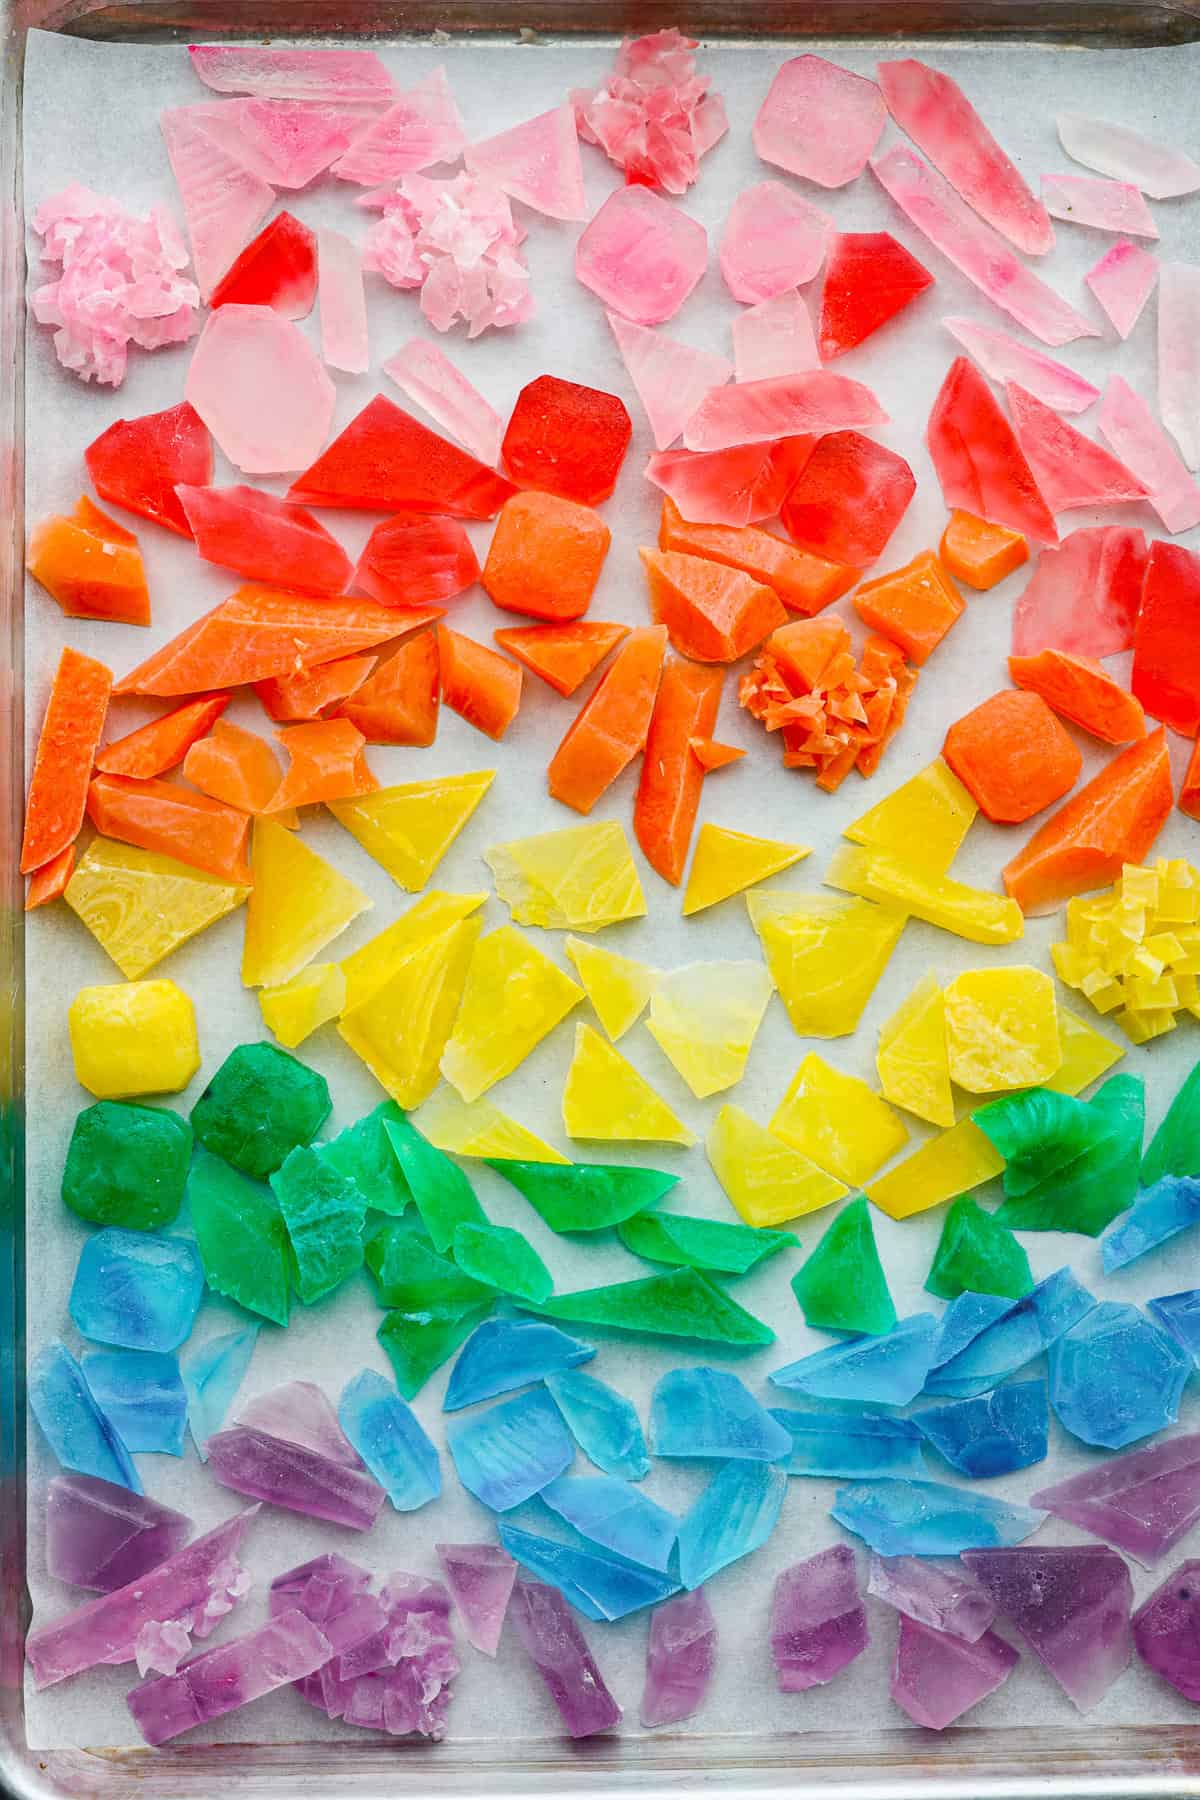
The appearance of these crystal candy pieces is something quite unique. They often look like little pieces of glass or precious stones, sparkling with a clear or colored glow. Some might be long and pointy, while others could be more chunky and irregular, but they all share that captivating, jewel-like quality. When you hold them up to the light, they truly seem to shimmer, making them a very pleasing sight. This visual appeal is, you know, a big part of what makes them so special, giving them a charm that's hard to ignore.
Gathering Your Sweet Supplies for Delightful Crystal Candy
Before you begin the exciting part of growing your own delightful crystals, it’s a good idea to gather everything you'll need. This preparation makes the whole process smoother and, honestly, a lot less stressful. You won't need a lot of fancy items, just some basic kitchen things and, of course, the main ingredient. Getting everything ready beforehand means you can just flow through the steps, which is rather nice.
- Unraveling The Enigma Who Is Donna Paulsen
- Discovering Channing Tatums Daughters Age A Glimpse Into Their Life
- Unveiling The Talented Leslie Charleson A Journey Through Her Life And Career
- Unraveling The Life Of Kristian Alfonsos Husband
- Unraveling The Life Of Morgan Freemans Spouse
For the ingredients, you'll need a good amount of granulated sugar, plain water, and then whatever flavorings and food colorings you might want to add. Simple stuff, really. For the tools, you’ll want a sturdy pot for boiling, a spoon for stirring, and several heatproof jars or tall glasses. You'll also need some string, like kitchen twine, and some clips or clothespins to hold the string in place. Skewers or chopsticks work well too, as a base for the string. Having these items laid out makes the next steps, you know, pretty straightforward.
How Do You Grow Delightful Crystals at Home?
The process of growing your own delightful crystal candy is, in essence, about creating a very specific sugar solution and then letting nature do its work. It starts on the stovetop and ends with a bit of waiting, but the steps are quite simple to follow. First, you'll combine your sugar and water in the pot. The general rule of thumb is about two parts sugar to one part water, but you can adjust slightly. You want to heat this mixture gently, stirring constantly, until all the sugar dissolves. It's important to make sure every single sugar grain disappears into the liquid, leaving a clear syrup. This step, you know, is really quite important for the success of your crystals.
Once the sugar is completely dissolved, you'll bring the solution to a boil. Let it boil for a minute or two, then remove it from the heat. This boiling helps ensure the solution is truly saturated, meaning it holds as much sugar as it possibly can. Now, let the syrup cool down for about fifteen to twenty minutes. This cooling period is pretty important because it helps prevent the sugar from crystallizing too quickly and forming tiny, less impressive crystals. You want the sugar to have time to bond into larger, more beautiful shapes, so a bit of patience here, is, you know, a good thing.
While the syrup cools, you can prepare your growing stations. Take your string and tie one end to a skewer or chopstick. The other end of the string should have a small weight, like a paperclip, to help it hang straight. You want the string to hang into the jar without touching the bottom or the sides. This is where your crystals will begin to form, so getting this setup just right is, like, pretty key. Once the syrup has cooled a bit, carefully pour it into your heatproof jars. Then, place your skewer with the string across the top of each jar, letting the string hang into the syrup. Cover the jars loosely with a paper towel or a clean cloth to keep dust out but allow for air circulation. This helps with the process, you see.
Now comes the part that requires a good deal of patience: the waiting. Place your jars in a quiet spot where they won't be disturbed, perhaps somewhere with a consistent room temperature. Over the next few days, you'll start to see tiny crystals forming on your string. As time passes, these tiny crystals will grow larger and larger, feeding off the sugar in the solution. This can take anywhere from a few days to a week or even longer, depending on the conditions. The longer you wait, the bigger your delightful crystals will likely become. It’s a bit like watching a slow-motion show, really, but the end result is very pleasing.
Adding Flavor and Color to Your Delightful Crystals
Making crystal candy isn't just about the pure sugar taste; it's also about making it your own with different flavors and colors. This is where you can really get creative and make your delightful crystals truly unique. The timing for adding these elements is, you know, pretty important. You'll want to add your flavorings and food colorings *after* you've taken the sugar solution off the heat and it has cooled slightly, but *before* you pour it into your jars. Adding them while the solution is boiling hot can sometimes cause the flavors to evaporate or the colors to change, which you don't want, obviously.
For flavorings, extracts like vanilla, peppermint, or fruit flavors work wonderfully. Just a few drops are usually enough, as they can be quite strong. You could also try a little bit of food-grade essential oil, like lemon or orange, for a more intense taste. When it comes to color, gel food colorings tend to give a more vibrant and consistent shade than liquid ones. A tiny bit goes a long way, so start with just a drop or two and add more if you want a deeper color. Imagine, for example, a soft pink rose-flavored crystal, or a bright blue raspberry one. The possibilities are, really, quite open.
Mixing and matching flavors and colors can lead to some really interesting results for your delightful crystal candy. You could make a batch of green apple-flavored crystals that are a vibrant green, or a golden-yellow lemon-flavored batch. Think about holidays or special occasions too. Red and green for festive times, or pastel shades for spring. This step is, you know, where your imagination can really come into play, making each batch a bit of a new adventure. The more you experiment, the more you'll discover what you truly enjoy creating and, you know, tasting.
What Makes These Delightful Crystals So Special?
There's something truly captivating about crystal candy that goes beyond just being a sweet treat. It's about the experience, the visual appeal, and the simple wonder of seeing something beautiful grow from humble ingredients. What makes these delightful crystals stand out is, you know, a combination of things that just make them feel a bit magical. They're not just candy; they're, in a way, little edible treasures that bring a feeling of joy and charm.
The first thing people often notice is how they look. The way light catches on their many facets, making them sparkle and shine, is truly something that causes pleasure. They really do resemble tiny, precious gems, and that visual element adds so much to their appeal. It's a treat for the eyes before it even reaches your mouth, and that's, like, pretty unique for a piece of candy. This beauty makes them perfect for decorating, or just for admiring, you know, for a moment before you take a bite.
Then there's the texture. Crystal candy has a distinct crunch on the outside, a satisfying snap as you bite into it. Sometimes, the inside can be slightly softer, offering a nice contrast. This unique texture, combined with the pure, sweet flavor, makes for a very pleasing eating experience. It’s not chewy or gooey; it’s a clean, crisp sweetness that is, in some respects, quite refreshing. This combination of visual charm and satisfying texture is, you know, what truly sets these delightful crystals apart from other sweets you might find.
Beyond the look and feel, there's the feeling of accomplishment that comes with making your own. There's a genuine sense of wonder when you pull a fully formed, sparkling crystal from the sugar solution. It’s a bit like a small victory, knowing you’ve created something so pretty and tasty from scratch. This personal satisfaction, this feeling of having made something that brings great pleasure, is, for many, the most delightful part of the whole process. It’s a simple joy, but a powerful one, really.
Displaying and Storing Your Delightful Crystal Candy
Once your delightful crystal candy has grown to its full potential, and you've admired its beauty, you'll want to think about how to show it off and keep it fresh. These beautiful sugar creations are, you know, far too pretty to just hide away. They make truly lovely gifts, adding a personal touch that store-bought items just can't match. You can tie a pretty ribbon around them, or place them in clear bags or small decorative boxes. They also look wonderful arranged on a dessert table, catching the light and adding a touch of sparkle to any gathering. People are often quite charmed by them, you know.
For storing your crystal candy, the main goal is to keep them dry and away from humidity. Moisture is the enemy of sugar crystals, as it can make them sticky or cause them to dissolve. Once your crystals are fully formed and you've removed them from the syrup, let them air dry completely for several hours, or even overnight, on a wire rack. This step is, you know, pretty important. Once they are thoroughly dry, store them in an airtight container at room temperature. A glass jar with a tight-fitting lid works perfectly. This way, your delightful crystal candy will stay crisp and beautiful for a good while, ready to be enjoyed whenever you wish.
Troubleshooting Your Delightful Crystal Candy Creations?
Even with the best intentions, sometimes things don't go exactly as planned when making delightful crystal candy. It's a natural part of any creative process, and, you know, a bit of problem-solving can actually be quite rewarding. If your crystals aren't growing, or if they're not quite what you expected, there are usually some simple reasons why. Don't worry, it's pretty common for the first attempt to have a few quirks, and learning from them is, like, part of the fun.
If you find that your crystals just aren't forming, or they're growing very slowly, the most likely reason is that your sugar solution wasn't saturated enough. This means you didn't have enough sugar dissolved in the water. The solution needs to be super-saturated for crystals to really take hold and grow. The fix for this is, honestly, quite simple: go back and add more sugar to your solution, heat it again to dissolve, and then let it cool before trying again. Also, make sure your jars are in a spot where the temperature stays pretty steady, as big temperature swings can mess with crystal growth, you know.
Sometimes, instead of a few large, impressive crystals, you might end up with a lot of tiny ones, or sugar forming on the bottom or sides of the jar instead of on your string. This often happens if the solution cooled too quickly, or if there were tiny sugar grains already present in the jar or on the string when you started. To avoid this, make sure your jars and strings are very clean. You can even "seed" your string by dipping it in the solution, letting it dry with a few tiny crystals, and then putting it back in the fresh solution. This gives the sugar a good starting point to grow on, which is, you know, pretty helpful for getting those big, delightful crystals.
Another common issue is when the crystals grow beautifully but then fall off the string when you try to remove them. This can happen if the crystals become too heavy for the string, or if the string itself isn't quite right. Using a slightly thicker kitchen twine can help, as it provides a better surface for the crystals to cling to. Also, be very gentle when removing them from the solution. Letting them dry completely before handling them too much is, you know, also a good idea. Patience and a gentle touch are key here, really, to keep your delightful crystal candy looking its best.
Beyond the Basics - Creative Twists for Delightful Crystals
Once you've mastered the basic technique of making delightful crystal candy, you might find yourself wanting to try some more creative ideas. There are so many ways to play with this simple concept and make truly unique and eye-catching treats. It's a bit like painting, where the basic colors are there, but you can mix and blend to create something completely new. This is where your inner artist can, you know, really shine through.
One fun idea is to create layered colors. You can do this by letting one color of crystal candy grow for a few days, then carefully pouring out some of the old solution and adding a new, different colored and flavored sugar solution. The new crystals will grow on top of the old ones, creating a beautiful, multi-colored effect. Imagine a crystal that starts blue and then transitions to purple, or perhaps, you know, a rainbow of colors. This takes a little more time and careful handling, but the result is truly something that causes joy.
You can also experiment with different shapes for your delightful crystals. While strings tend to produce elongated shapes, you can try using small, clean molds or even specific arrangements of skewers to encourage different formations. Some people have even had success growing crystals on clean, food-safe sticks or lollipop sticks directly, which makes them even easier to enjoy. The key is to provide a clean surface for the sugar to attach to. Adding edible glitter to your solution, or dusting it on the finished crystals, can also give them an extra sparkle, making them even more visually pleasing. It’s a little touch that, you know, makes a big difference.
So, whether you're sticking to the classics or trying out these creative twists, making delightful crystal candy is a wonderfully satisfying activity. It's a chance to make something beautiful, something sweet, and something that brings a real sense of charm to your kitchen. The process itself is quite simple, and the results are truly something that causes pleasure, both to make and to share. It's a sweet adventure, really, that's well worth taking.
- Unraveling The Magic Of The Vampire Diaries First Season
- Katy Mixon The Multifaceted Star Of Hollywood
- Unveiling The Life And Career Of Drake Hogestyn
- Understanding Curfews For Generation Alpha A Balancing Act
- Unraveling The Mystery Who Is Kathleen Turners Partner
Crystal Candy - infoodita

Crystals For Overthinking - Delightful Mom Food

79 Crystals Digital Crystal Guide How to Use Crystals Guide Wellness
