Mastering The Blowout Taper With Curly Hair - Your Guide
Getting that sleek, polished look with a blowout taper on curly hair can feel like a dream, a bit like creating a perfect piece of art. For so many people with curls, the idea of getting their hair straight and smooth, yet still full of life, seems a really big ask. It's that kind of style that just about everyone admires, offering a beautiful shape that shows off your face and neck. This look gives a wonderful sense of refinement, too, making your curls appear soft and flowing, rather than just wild.
You might think achieving this kind of style at home is something only a professional can do, perhaps that it's too involved or needs some kind of secret touch. Well, actually, that's not quite the truth. With the right approach and a little bit of practice, you can absolutely get that salon-quality finish right in your own bathroom. It’s about understanding your hair and how it reacts to different steps, which is pretty much like learning any new skill, you know? It just takes some patience and a good plan.
This guide is here to walk you through the whole process, helping you turn what might seem like a difficult hair challenge into a satisfying routine. We'll talk about everything from getting your hair ready to the actual steps involved in styling, and even how to keep your look fresh for longer. By the end, you'll have a clearer idea of how to approach this style, making it a regular part of your hair care, more or less, and feeling quite confident about it, too.
- Choosing The Best Food Delivery Service Doordash Or Ubereats
- Unveiling The Family Life Of Axl Rose Does Axl Rose Have Kids
- Unraveling The Life Of Kristian Alfonsos Husband
- Exploring The Family Life Of Joshua Morrow A Deep Dive Into His Children
- Exploring The Fascinating World Of Dafne Keen Ed Videos
Table of Contents
- What is a Blowout Taper, Anyway?
- Getting Ready for Your Curly Hair Blowout Taper
- How Do You Prepare Curly Hair for a Blowout Taper?
- The Actual Blowout Taper Steps
- What Tools Help with Mastering the Blowout Taper for Curly Hair?
- Can You Achieve a Perfect Blowout Taper on Your Own Curly Hair?
- Keeping Your Blowout Taper Looking Good
- Why Does My Blowout Taper Not Last on Curly Hair?
What is a Blowout Taper, Anyway?
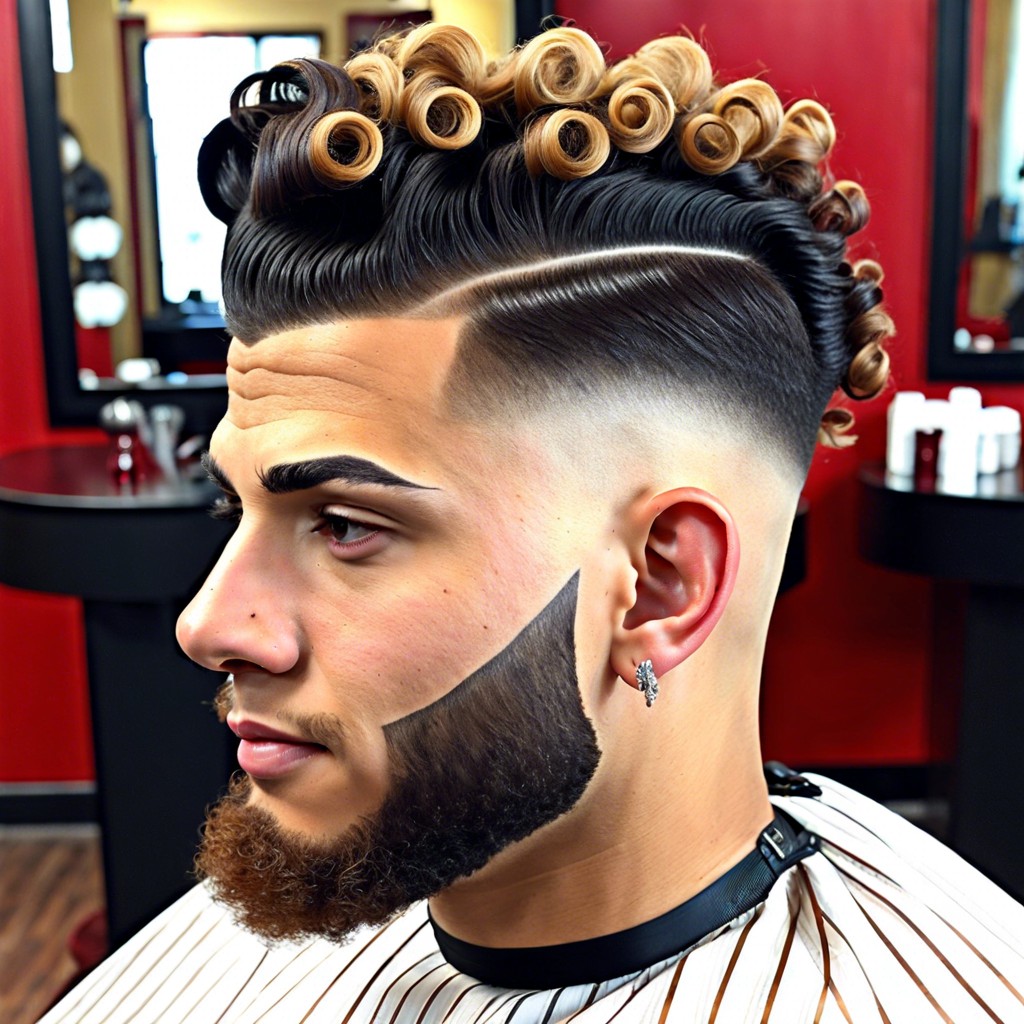
A blowout taper is a hair style where your hair is blown dry to be mostly straight, or at least very smooth, but with a gradual decrease in length or volume around the sides and back. It's a way of shaping the hair so it flows neatly, often with a bit more length on top, then slowly gets shorter or flatter as it goes down towards the neck. For people with curly hair, this means taking those lovely coils and stretching them out, making them smooth and sleek, then giving them a very specific, neat outline. It’s like taking something wonderfully wild and giving it a very refined, clean edge, you know? It creates a really striking contrast that many find very appealing, too.
This style works so well for curly hair because it lets you show off the natural texture while also having a polished finish. You get the best of both situations, in a way. The top part of your hair can still have a lot of body and movement, while the sides and back are kept very trim and tidy. This makes for a look that's both bold and very put-together. It’s about taking control of your curls and guiding them into a particular shape, almost like an artist shaping clay. The "mastering" part here is really about getting that precise, finished form that looks just right, every single time. It's a skill you build up, like anything else, and it feels pretty good when you get it down.
Getting Ready for Your Curly Hair Blowout Taper
Just like getting ready for any big project, preparing your hair for a blowout taper is a really important step. You wouldn't try to build something without having all your tools and materials ready, would you? Well, the same idea applies to your hair. The right products and tools make a huge difference in how your blowout turns out and how long it lasts, too. Think of it as setting the stage for a great performance; everything needs to be in its proper place. This preparation is pretty much the foundation for achieving that smooth, long-lasting finish you're hoping for. It's where the initial "mastering" begins, actually, by making sure you have all your ducks in a row before you even turn on the dryer.
- Unraveling The Mystery Does Fred Again Have A Girlfriend
- Unraveling The Talented Cast Of Waterworld
- The Enigmatic Cast Of Harry Potter 5 A Deeper Look
- Unraveling The Mystery Who Is Neil Youngs Girlfriend
- Unveiling The Talents Of The 227 Sitcom Cast A Glimpse Into Their Lives
When it comes to products, you'll want things that help smooth the hair, protect it from heat, and give it some hold without making it stiff. A good leave-in conditioner is a must, as it helps to soften the curls and make them easier to work with. Then, a heat protectant spray is absolutely essential; it creates a shield around your hair strands, guarding them from the warmth of the dryer. For a bit of hold and extra smoothness, a styling cream or a light serum can be very helpful. These products work together to prepare your hair, much like getting a final mix ready for a sound recording, ensuring everything is clean and prepared for the next stage. It's all about getting your hair ready for its final, polished look, you know?
As for tools, a good quality blow dryer with a nozzle attachment is your main player. The nozzle helps direct the air flow, which is key for getting hair straight and smooth. You’ll also need a brush, and the type of brush really depends on your hair's thickness and how much tension you want. A round brush is great for creating volume and curl at the ends, while a paddle brush is good for general smoothing. Having the right tools at hand makes the whole process much smoother, letting you focus on the technique rather than struggling with inadequate equipment. It’s a bit like having the right instruments for a specific job; they just make everything easier and more effective, too.
How Do You Prepare Curly Hair for a Blowout Taper?
The first step in getting your curly hair ready for a beautiful blowout taper is a good wash and condition. You want your hair to be clean and free of any product buildup that might weigh it down or make it feel greasy. Use a shampoo that cleanses well but doesn't strip your hair of its natural moisture, and then follow up with a rich conditioner. Leave the conditioner in for a few minutes to let it really sink in, especially if your hair tends to be dry. This initial cleanse and hydration is pretty much like setting a clean slate for your hair, making it soft and ready to be shaped. It’s a foundational step, actually, that you shouldn't skip.
After rinsing, gently detangle your hair. Curly hair can be quite delicate when wet, so use a wide-tooth comb or your fingers, starting from the ends and working your way up to the roots. Be patient and gentle; pulling too hard can cause breakage, which is definitely something you want to avoid. Once your hair is detangled, apply your leave-in conditioner and heat protectant. Make sure to distribute these products evenly throughout your hair, paying extra attention to the ends, which tend to be the most fragile. This step helps to smooth the cuticle and protect your hair from the warmth that’s coming, which is pretty important, you know?
Finally, sectioning your hair is a really helpful strategy. Divide your hair into manageable parts, perhaps four to six sections, depending on how thick your hair is. Use hair clips to keep the sections separate. Working in smaller sections makes the blowout process much easier to control and ensures that every part of your hair gets enough attention. It's a bit like breaking down a big task into smaller, more achievable chunks. This structure is key for success, giving you a clear path to follow as you work through your hair. It really helps with the overall "mastering the blowout taper" process, too, making it feel less overwhelming.
The Actual Blowout Taper Steps
Once your hair is clean, conditioned, and sectioned, you're ready to begin the actual blowout taper process. This is where you really start to see your hair transform, and it's also where your careful preparation pays off. Take one section of hair, making sure it's not too large, and clip the rest of your hair out of the way. You want to work with a manageable amount so you can give each piece the attention it needs. This focused approach is a bit like making precise adjustments to a sound file, where each small change contributes to the overall polished result. It's all about control, really.
Using your blow dryer with the nozzle attachment, direct the air down the hair shaft as you pull the hair taut with your brush. The key here is to keep the dryer moving and to follow the brush. Don't hold the dryer in one spot for too long, as this can cause damage. As you dry, you're not just removing water; you're also smoothing the hair cuticle, which is what gives you that sleek, shiny finish. Work from the roots to the ends, ensuring each section is completely dry before moving on. This careful, steady work is pretty much what helps you get that smooth, straight look you're going for.
For the taper effect, pay special attention to the sides and back of your head. As you work on these areas, use your brush to direct the hair downwards and slightly inwards, following the natural curve of your head. You want these sections to lie flat and neat against your scalp, gradually blending into the longer hair on top. This is where the "taper" really comes into play, creating that clean, sculpted shape. It takes a bit of practice to get the hang of the movement, but you’ll find your rhythm pretty quickly, you know? It's a bit like learning to draw a smooth line; it just takes a steady hand and some repetition.
What Tools Help with Mastering the Blowout Taper for Curly Hair?
Choosing the right tools is a big part of getting a great blowout taper on curly hair. Beyond just a good blow dryer, the brush you use plays a very significant role. A round brush is excellent for adding volume and creating a bit of a bend or curl at the ends, which can give your blowout a softer, more styled finish. The size of the round brush matters, too; a larger barrel will give you more volume and a looser wave, while a smaller one will create tighter curls or more tension for straightening. It’s about matching the tool to the effect you want, actually, which is pretty clever.
A paddle brush, on the other hand, is really good for general smoothing and straightening, especially on longer sections of hair. It covers a wider area, making it faster to dry and straighten large portions. Some people prefer a denman brush, which has stiff nylon bristles that are great for creating tension and smoothing out very curly or coily hair. The tension created by the brush working against the heat of the dryer is what helps to stretch out the curls and make them straight. This choice of brush is a bit like choosing the right instrument for a specific part of a song; each one has its own purpose and helps achieve a certain sound, or in this case, a certain hair texture, you know?
The nozzle attachment on your blow dryer is also a very important tool. It concentrates the air flow, directing the heat exactly where you need it. Without a nozzle, the air blows everywhere, making it harder to smooth the hair and increasing the chances of frizz. Some dryers also come with a cool shot button, which is great for setting the style once a section is dry. Blasting a section with cool air after it’s been heated helps to lock in the smoothness and shine. These little additions to your basic dryer make a big difference in the final result, allowing you to truly get that polished look, pretty much. They are key to truly mastering the blowout taper for curly hair.
Can You Achieve a Perfect Blowout Taper on Your Own Curly Hair?
Absolutely, you can achieve a really good blowout taper on your own curly hair. It might take a few tries to get it just right, but with practice, you'll find your rhythm and technique. Think of it like learning to play an instrument or starting a new hobby; the first few attempts might not be perfect, but you learn something new each time. The more you do it, the more comfortable and skilled you'll become. It's a bit like starting to create your own music; you just keep at it until it sounds exactly how you want. This personal practice is really what helps you get better, you know?
One tip for self-styling is to use mirrors effectively. A handheld mirror along with your main bathroom mirror can help you see the back and sides of your head, which are often the trickiest parts to style on your own. Another helpful idea is to work in front of a good light source, so you can clearly see what you're doing and spot any areas that might need more attention. Breaking the process down into small, manageable sections, as we talked about earlier, also makes a huge difference. Don't try to do too much at once; focus on one section until it's done before moving to the next. This methodical approach is pretty much key to success when you're working on yourself.
Also, don't be afraid to experiment with different products or brush types to see what works best for your specific hair type and texture. Every head of curly hair is a little bit different, so what works perfectly for one person might need a slight adjustment for another. It's a process of discovery, in a way. The goal is to feel confident and comfortable with the steps, knowing that you can get a beautiful, smooth finish whenever you want. You are totally capable of getting that perfect blowout taper on your own curly hair, and it’s a very satisfying skill to have, too.
Keeping Your Blowout Taper Looking Good
Once you’ve put in the effort to create a lovely blowout taper, you’ll naturally want to make it last as long as possible. Keeping your style fresh requires a few simple habits and perhaps a couple of touch-up products. Think of it like maintaining a garden; a little bit of care each day helps it stay beautiful. The goal is to extend that smooth, polished look for as many days as you can, saving you time and effort in the long run. This ongoing care is pretty much what makes the style worthwhile, you know?
One of the best ways to preserve your blowout overnight is to wrap your hair. You can use a silk or satin scarf, or even a silk pillowcase. These materials are much gentler on your hair than cotton, reducing friction and helping to prevent frizz and creases. You might also want to loosely gather your hair into a high ponytail or a loose bun on top of your head before wrapping it. This helps to keep the hair from getting flattened or messed up while you sleep. It’s a simple trick, but it makes a big difference in how your hair looks the next morning, too.
During the day, if you notice any areas starting to revert or get a little frizzy, a dry shampoo can help absorb any oil at the roots, and a light anti-frizz serum can smooth down any flyaways. A quick blast with a blow dryer on a cool setting, perhaps with a paddle brush, can also help to refresh any sections that have lost their smoothness. This kind of minor upkeep is a bit like doing small, regular checks to ensure everything is still running smoothly. It’s about being proactive to keep that beautiful shape intact, ensuring your blowout taper continues to look its best, more or less.
Why Does My Blowout Taper Not Last on Curly Hair?
It can be really frustrating when you spend time on a blowout taper, only for it to fall flat or get frizzy too quickly. There are a few common reasons why your blowout might not last on curly hair, and understanding them can help you fix the issue. One of the biggest culprits is humidity. Curly hair tends to absorb moisture from the air, which causes the curls to revert to their natural state. Using anti-humidity products and finishing sprays can help create a barrier against moisture, but in very humid conditions, it can be a real challenge to keep hair straight. It’s like trying to keep a sandcastle dry at the beach, you know? Sometimes the environment just works against you.
Another reason could be insufficient preparation or technique. If your hair isn't thoroughly clean and free of product buildup before you start, it might not hold the style as well. Also, if you don't dry each section completely or if you don't use enough tension with your brush, the hair might not be truly straight or smooth, making it more prone to reverting. Sometimes, people don't use enough heat protectant, or they use too much product, which can weigh the hair down. It's a bit like trying to make a cake without all the right ingredients or not baking it long enough; the result just isn't what you hoped for, actually.
Finally, your hair type itself plays a role. Some curly hair textures are simply more resistant to straightening and tend to revert more easily than others. If your hair is very fine, it might not hold volume as well, and if it's very coarse, it might need more heat and tension to get truly straight. It's important to be realistic about what your hair can do and to adjust your expectations and techniques accordingly. Experiment with different product combinations and drying methods to find what truly works for your unique hair. With a little bit of trial and error, you can definitely improve how long your blowout taper lasts, which is pretty satisfying.
So, we've talked about what a blowout taper is and why it's a great style for curly hair, giving you that polished yet full look. We covered the essential steps for getting ready, from washing and conditioning to sectioning your hair, making sure you have all the right products and tools. We also went through the actual drying process, focusing on technique and how to achieve that smooth, tapered shape. We looked at the best tools to use, like different brushes and dryer nozzles, and discussed how you can absolutely get this style done on your own hair with some practice. Lastly, we touched on how to keep your blowout looking good for longer and some common reasons why it might not last, offering ways to troubleshoot those issues.
- Discovering The World Of Jyp Meme A Fun Exploration
- Unveiling Brian Cheskys Girlfriend A Journey Into Love And Success
- Transform Your Holidays With Walmart Christmas Decorations
- Choosing The Best Food Delivery Service Doordash Or Ubereats
- Unveiling The Life And Career Of Kesha Rose Sebert
15 Blowout Taper Fade Curly Hair Ideas for a Fresh Look – Burst of Style

Effortless Style: Blowout Taper With Curly Hair For A Polished Look
Best 19 Blowout Taper - Taper Haircuts
